You might have tried many apps to set a ringtone on your iPhone but it has seen that most of the iPhone users fail to do that because most of these apps do not have access to the needed iPhone folders and thus they cannot add the tones to the tone list in your iPhone. To get those tones appear on your iPhone you need to sync your iOS device with iTunes.
See also- How to change Apple ID on second hand iPhone
Here is this post I will discuss the steps to use iTunes to set a ringtone on your iPhone, you need to sync your phone to import the tones and then you can set any of them as a ringtone or text one. Unfortunately, Apple has not made this process easy as it should be. However, here is a step by step guide to set a ringtone on your iPhone.
Steps to set a ringtone on your iPhone
Step 1
Launch iTunes on your PC by double clicking on it or you can also find it from Start Menu.
Step 2
From the library choose a song that you want to set as a ringtone on your iPhone and right click on it, then you need to select Get info.
Step 3
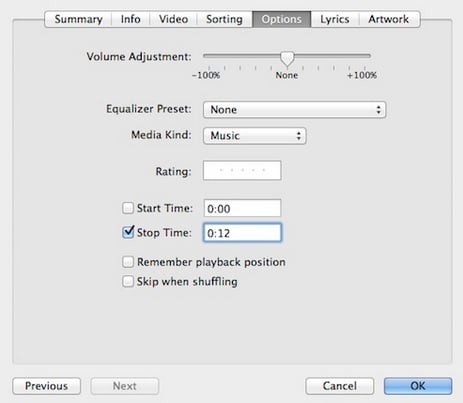
Now Options tab needs to be selected, mark the Start Time and Stop Time checkboxes. Type in times at which you want the ringtone or song to start and stop. First play the track and note down the time you want the song to be started; the stop time should be within 30 seconds as this is the highest length for a ringtone for any Apple devices.
Step 4
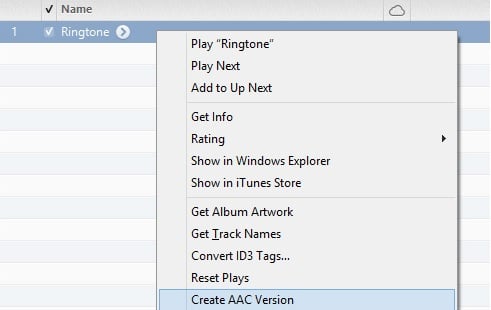
Click Ok. Again right click on the track and then Create AAC version needs to be selected. A duplicate track will be shown to you as iTunes will convert the song, but you will be able to recognize it by the length of track in seconds.
If you do not find the option Create AAC version you need to click the Menu which is located at the top left corner of iTunes and then choose Preferences > Import Settings > When you insert a CD > Import using: AAC Encoder.
Step 5
The song that you selected in step 1, right click on that and select Get info, then go to Option tab and unmark the Start Time and Stop Time checkboxes to get them back to their original time and lastly click Ok. If you do not follow this step, whenever you will play this song, it will only play the part between the selected start and stop time.
Step 6
You need to right click on the short track and then click on Show in Windows Explorer. You will see the highlighted file, right click on it and select Rename. Now you need to change the extension to .m4r from .m4a and click Yes when you will be prompted if you wish to change the extension.
If the file extension .m4a is not showing to you, first open Windows Explorer, click Organize button, select Folder and search option from menu. A window will appear, click View tab there, then scroll down and unmark the checkbox located next to “Hide file extension…”
Step 7
In order to add the file in the iTunes library’s Tones section, double click on the file.
In iTunes 12, click on the 3 dots, then choose Tones from there to open Tones section. Then you can drag the .m4r file from File explorer and drop it there.
Step 8
For Windows users there is no need to erase the ringtone “song” from the music library of iTunes for this to work but you need to do it as a housekeeping task. It will not play if you leave the song there because the file name has been changed already.
For Mac users, many people complained that the ringtones are not coming in the Tones section of the latest iTunes. In such case you need to delete ringtone ‘song’ entry in the Music library of your iTunes. Then going to Finder double click on the .m4r file, now it should be showing in Tones.
For iTunes 11 and previous users, the drop-down arrow needs to be clicked to select the Tones section of library. The ringtone should be there but if you do not have a Tones section, it’s because in the iTunes preferences Tones is not selected. To activate the Tones, click menu which is located at the top side left corner of iTunes and then Preferences. Ensure that you have marked the Tones checkbox, click Ok. Now you should see the tones list.
Step 9
For iTunes 11 and before: Connect your PC and iPhone. On the right side of iTunes, iPhone will appear, click on it. At the top menu is there, click on the Tones button from there and confirm that the Sync Tones is marked. You can choose All tones or Selected tones but in case of Selected tones make sure you have ticked the tones that you want on your iPhone. Click Apply.
For iTunes 12 users: Go to Tones section as mentioned in step 7. When your iPhone is connected to your computer, an icon will appear to the right side of the 3 dots. Do not click on that now.
Just select the songs that you want and they will be highlighted in blue color. Click on any one and hold and then drag them on the phone icon. You will get to see a list on the left side, after dropping the tones on the device, a sync will start.
Step 10
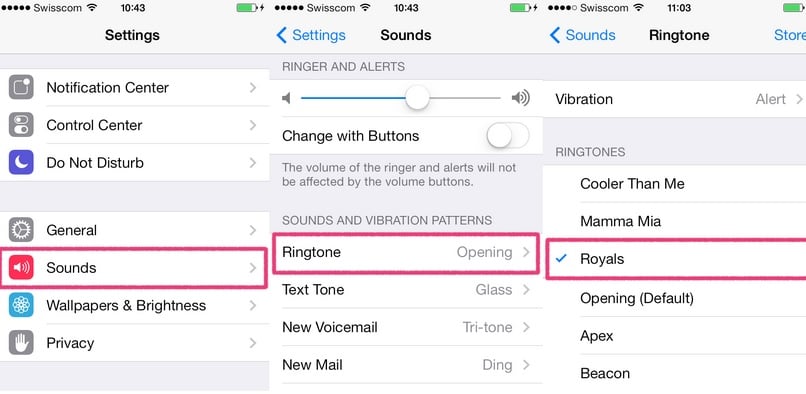
When the sync is completed, on your iPhone go to Settings > Sounds > Ringtone. You will see the custom tones at the top of the list. You can select any of them as a ringtone of your iPhone.